| Scripting Resources for DigitalMicrograph™ |

Installing a Script
Download a script from this website to your desktop. DigitalMicrograph script files have the extension .s. Scripts are plain text files so you can open them with any text editor to view or edit them. If you have DigitalMicrograph installed on your computer, double clicking on the script file will cause it to open in DigitalMicrograph in a text editing window. Here you can edit, save and execute your script. Writing scripts from scratch is detailed in the other tutorials on this website.
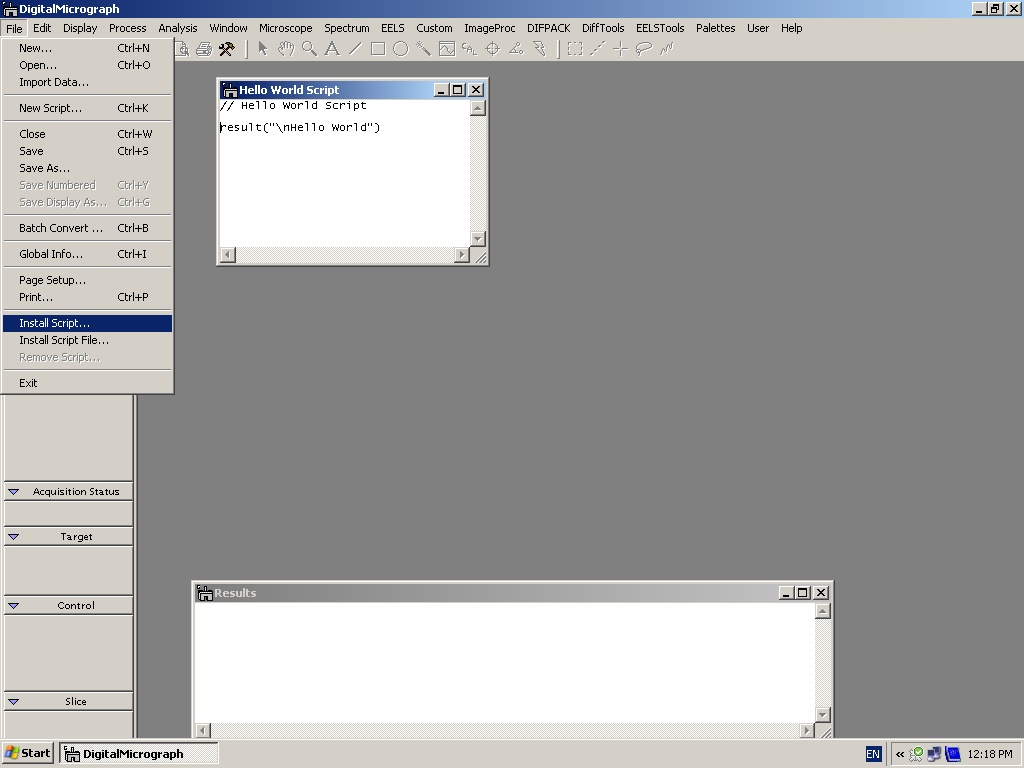
In this simple example the script is called 'Hello World Script'. All it does is output the phrase 'Hello World' to the Results window. To install this script have the script open and foremost in DigitalMicrograph (the title bar is blue). From the 'File' menu select the 'Install Script' option.

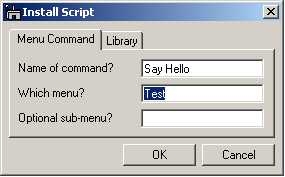
The Install Script dialog appears. There are two ways scripts can be installed. If they are installed as regular script files, they appear as items in the DigitalMicrograph menus. The dialog below shows the 'Hello World Script' being installed into a new Menu called 'Test'. By default, new scripts will get installed into the 'Custom' menu, but users can create their own menus. By including a name in the the 'Optional sub-menu' it is possible to build up hierarchical directories of scripts. By default, the name of the command, ie how it will appear in the menu, is set to the script name. It is a good idea to name scripts explicity, so it is clear what they do. However, commands in menus should not be overly long, so you may want to shorten the name. Here, the name has been shortened from 'Hello World Script' to 'Say Hello'. Clicking OK, will cause the script to be installed.

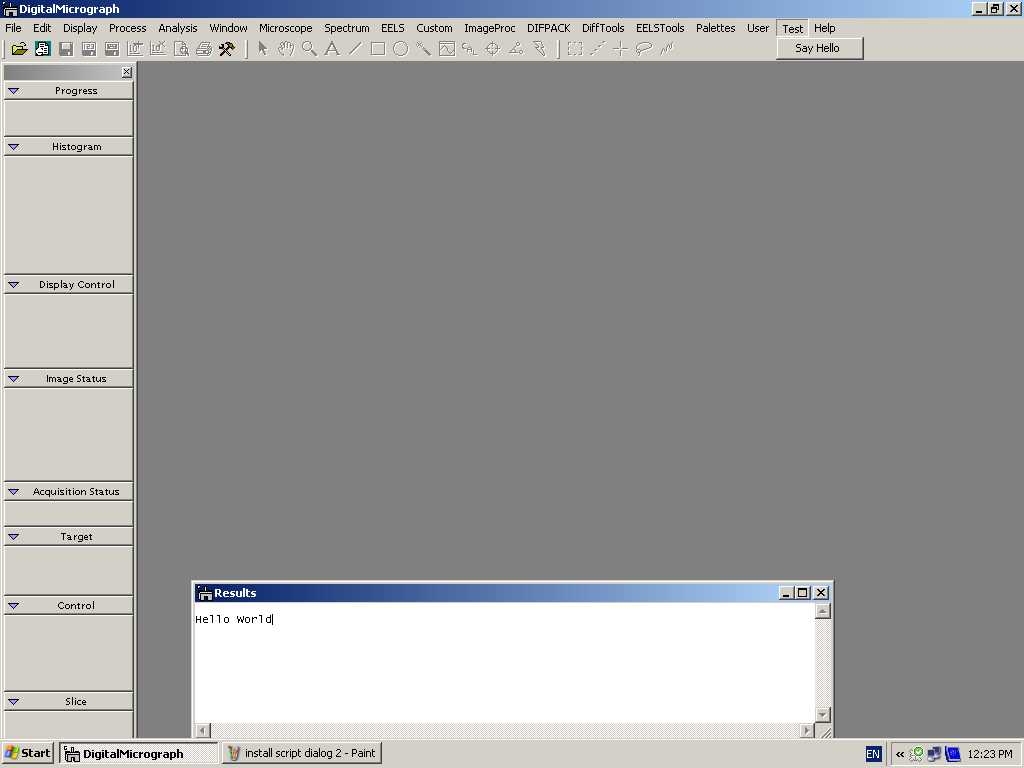
After installation a new menu called 'Test' appears, with one command called 'Say Hello'. Selecting this menu item causes the phrase 'Hello World' to be written to the Results window. Scripts can be removed by selecting the 'Remove Script' option from the File menu. A major limitation with managing scripts in this way, is that when a script is removed and an updated version in installed, the ordering of the commands in the menu changes. Newly added scripts always appear at the bottom of the menu. Chaning the order of menu commands confuses users. A better way of managing large numbers of scripts, including version control, can be found in the Package Creator script.

Transferring Script Installations
When scripts are installed in this manner they get written into a DigitalMicrograph preference file. This lives inside the Programs/Gatan/DigitalMicrograph/Prefs folder and is called DigitalMicrographCF.8. If you install many scripts and wish to copy your script setup to another instance of DigitalMicrograph, you can do this easily by simply copying the .8 preference file from one machine to another. Ensure DigitalMicrograph is not running when you do this. (You can replace the existing .8 preference file on your target machine. DigitalMicrograph created an empty .8 preference file when it was run for the very first time. It will also recreate this empty file, if it doesn't find the .8 file). In order to ensure it has the correct permissions, once you have copied the .8 file to your target machine, duplicate it by copying it and pasting it. This creates a file called 'Copy of DigitalMicrographCF.8'. Delete the .8 file you originally copied across, then change the name of the duplicate to remove the 'Copy of ' part of the file name. When you next start DigitalMicrograph all the scripts will be in place exactly as they appeared on your original setup.Executing Scripts.
You do not need to install a script to run it. You may wish to test a script to see if it works, or perhaps use it only once then discard it. Script files can be executed by having them foremost (title bar is blue), then hitting Control + ENTER. In the latest version of DigitalMicrograph, there is a new style script editor window, which has an execute button in the script window - simply press this to make the script run.
Halting Scripts
If you are developing scripts, particularly those which use loops, you may end up getting caught in an infinite loop. Here the script never ends, and DigitalMicrograph will become unresponsive until you halt the script. You can halt the script execution by pressing CONTROL+NUM Lock (on the numerical keypad). The mapping may differ between keyboards.
Library Scripts
There are two reasons to install Library scripts. You may wish to invoke some script functionality when DigitalMicrograph first launches, altenatively, you may want to extend te DigitalMicrograph scripting language with your own commands. If scripts are installed as Library files, they are loaded and executed when DigitalMicrograph launches. If the script file does something when executed - like print some text in the Results window or perhaps put up a prompt reminding users to log their microscope usage - this is what happens when the DigitalMicrograph is launched. If the script is a function without any main program to call it, then the function gets loaded into memory and becomes, in effect, an extension of the DigitalMicrograph scripting language. Users can then add lines of code to their scripts which call the library functions. This is a great way of extending the capabilities of DigitalMicrograph. The only downside is that scripts which call users' own library functions will only work on instances of DigitalMicrograph where those library scripts are installed. For better portability, it may be better to include such functions inside the scripts which call them, they can then be used on any instance of DigitalMicrograph. For more information on Functions - see the Scripting DigitalMicrograph tutorial.
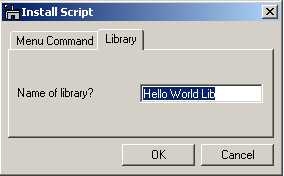
To install a script as a library script, follow the instructions for installing scripts as menu items above. However, when the 'Install Script' dialog appears, click on the Library tab. The name of the library file is the name of the script by default. If you are installing library files, it is a good idea to append 'Lib' on the end, so that you know the script is a library file. Click OK. You can remove library files by selecting the 'Remove Script' option from the File menu. Scripts are listed in the order in which they are installed, and menu and library scripts are listed together. Adding Lib to a library script name makes it easier to locate, since unlike a menu script, there is no command name visible for a library script, to remind you what it was called. The 'Package Creator' script can make managing large installations of scripts/libraries much easier.
